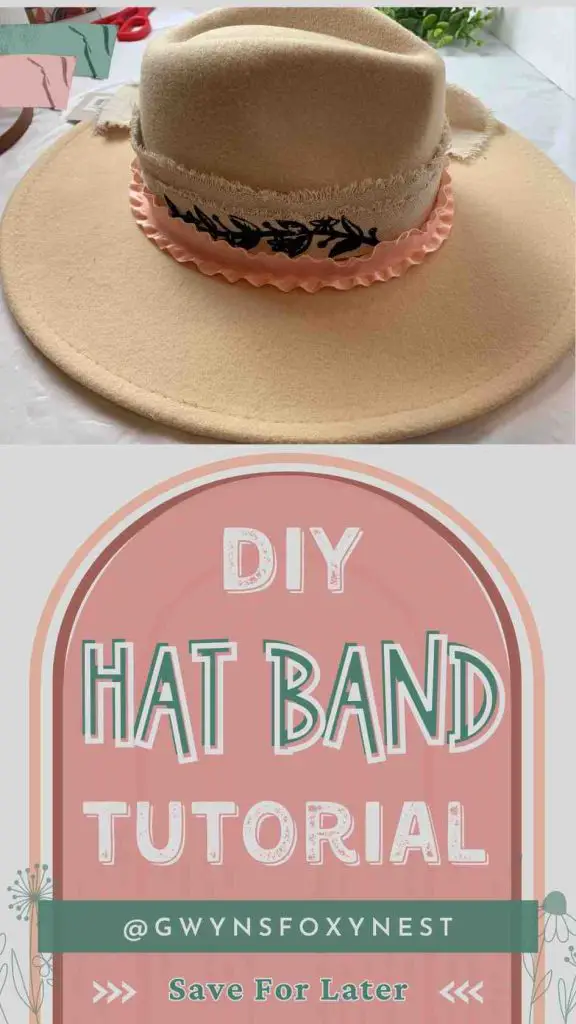
No sewing skills required! This beginner-friendly ribbon hat band tutorial will have you crafting a chic accessory in no time using Chalk Couture ink on fabric.
Hats are versatile accessories that can elevate any outfit. Whether you’re rocking a fedora, sun hat, or cowboy hat, a DIY ribbon hat band is a stylish addition that can make your hat look even more special. Instead of buying a pre-made hat band, why not create your own boho hat bands? Making a DIY hat band out of ribbon and drop cloth fabric is an easy and fun DIY project that anyone can do. Whether you are age 18 or 60 this how-to decorate a hat band tutorial will work for you. Here’s a step-by-step guide on how to make a hat band out of ribbon on a budget.
Full Disclosure: This article may contain affiliate links. For more info, see the Disclaimer Policy
Shop with Rakuten to save money with online shopping
Materials Needed For How To Make A Hat Band Project:
- Ribbon (choose a type that complements your hat)
- Drop Cloth – I bought mine at Harbor Fright because I like their color the best. It’s more of a cream.
- Chalk Couture
- Scissors
- Measuring tape
- Embellishments (optional)
- Household Iron
- Parchment Paper
- E600 Fabric Glue

Step-By-Step Instructions To Make A Hat Band Out Of Ribbon
Step 1: How To Make Hat Bands
Measure and Cut the Ribbon: Measure the circumference of your hat where you want the band to go. Cut the ribbon to this length, leaving a little extra for overlap.
Step 2: Glue the Ribbon onto the Hat
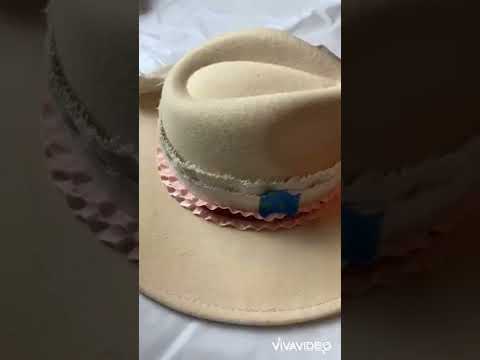
Place a small amount of E600 Fabric Glue on the hat where you want the ribbon to stay. Go completely around the hat until the two ends come together, overlapping slightly. I try to make the overlapping come together on the side where I’ll be tieing the drop cloth so it hides the seam. Put something over the ribbon to hold it in place while it dries for 24 hours. I used the old brown hat band as you can see in the youtube tutorial above.
Step 3: How To Make A Fabric Hat Band
Measure out the drop cloth to the size you would like on your hat. This is something you will need to play with until you have the right width and length. Next, you will add the Chalk Couture stencil art to the drop cloth by placing the stencil where you want the design. Take a small amount of Chalk Couture ink and apply it with a squeegee. Let the ink dry for 24 hours!
Once it is dry, you will want to make it waterproof by laying a piece of parchment paper over the dried ink design. Take an iron and set it on medium heat and iron the front for 4 minutes and the back for 4 more minutes. Make sure the parchment paper is in between the hat band and the iron at all times and that you’re moving the iron over the design for the full 8 minutes.
Now, it’s ready to tie on the hat band. The drop cloth design is weatherproof and waterproof!
Step 4: Add Embellishments
If you want to add embellishments to your hat band, now is the time to do it. Choose any additional embellishments you want to add, such as beads, buttons, or flowers. Sew the embellishments onto the hat band, taking care to secure them tightly. Trim any excess thread.
- A leave-on lip mask powered by Korean skincare to soften lips while delivering intense moisture and antioxidants while you sleep. Enriched with Berry Fruit Complex, Murumuru Seed, and Shea butter.
Variations and Ideas
There are many variations and ideas for making a hat band out of ribbon. You can experiment with different ribbon widths, textures, and colors to create a unique look. Here are a few ideas to get you started:
- Use a wide ribbon to cover more of the hat or a narrow ribbon for a delicate look
- Add a bow to the front or back of the hat band
- Use a contrasting color ribbon to create a bold statement
- Add a charm or pendant to the hat band for extra flair
Step 5: Clean Up
Our stencils are reusable and clean-up is easy. Simply wash the stencil and squeegee with cold water to clean them. Lay face down to dry. Once it’s dry simply place it back on the white backer sheet (sticky and shine side go together) to reuse for the next craft project.
Making a DIY hat band out of ribbon is a simple and fun DIY project that can add a personalized touch to your hat. By following these easy steps, you can create a unique accessory that reflects your personal style. Don’t be afraid to experiment with different ribbons and embellishments to create a one-of-a-kind look. So next time you want to give your hat a little extra pizzazz, try making your own hat band out of ribbon!
Online Youtube Tutorial – Hat Band Ideas
FAQs
What fabric glue do you use to make hat bands?
I recommend using the E600 Fabric Glue. It worked really well for holding the ribbon to the hat.
What is the band around a hat called?
Hatband
What material are hat bands made of?
Hat Bands can be made of ribbon, cloth, leather, silk, feathers or cotton. They make each hat personalized so use materials that go with your personal style.

3 Comments