Let’s be honest …
… We all have at least one old T-shirt hiding in the back of the closet. Maybe it’s faded, maybe it doesn’t fit quite right anymore, or maybe you’re just bored of it. Instead of tossing it out, why not turn it into something fresh, stylish, and completely you? That’s where the magic of a DIY cut T-shirt comes in.
Full Disclosure: This article may contain affiliate links. For more info, see the Disclaimer Policy
Cutting and redesigning your own T-shirt isn’t just about saving money. It’s about creativity. It’s about taking something ordinary and giving it a personality. Think of your T-shirt as a blank canvas. With just a pair of scissors and a little imagination, you can transform it into a crop top, a fringe festival piece, a chic tank, or even a bold statement design.
The best part? You don’t need to be a fashion designer. You don’t need a sewing machine. In fact, many of the coolest DIY cut T-shirt designs require no sewing at all. Just simple cuts and a bit of confidence.
DIY fashion also supports sustainability. Instead of contributing to fast fashion waste, you’re repurposing what you already own. It’s budget-friendly, eco-friendly, and uniquely yours. And trust me .. once you start cutting, you might find it surprisingly addictive.
So grab that forgotten tee. We’re about to turn it into something you’ll actually want to wear again.
Why DIY T-shirt Upcycling Clothes Are Trending
Have you noticed how social media is filled with personalized shirts lately? From TikTok tutorials to Pinterest boards, DIY T-shirts upcycles are everywhere. But why has this trend exploded?
First, individuality is everything right now. People don’t just want to wear clothes — they want to express themselves. A store-bought shirt might look good, …
… but a customized one tells a story. It says, “I made this to fit me. My size.. My body type.. My personality.. My style.. ” And that’s powerful.
Second, DIY fashion fits perfectly into today’s budget-conscious mindset. With rising prices, many people are choosing to upgrade what they already own instead of shopping for new items. Turning an oversized tee into a trendy off-shoulder top costs nothing but a few minutes of your time.
There’s also the sustainability factor. Fast fashion has a huge environmental impact. By reworking your old shirts, you’re reducing waste and extending the life of your clothing. It’s a small step, but it matters.
And let’s not forget comfort. T-shirts are already soft, broken-in, and cozy. When you customize them, you keep that comfort while adding style. It’s like having the best of both worlds — fashion and function.
Plus, DIY shirt cutouts are therapeutic. Something is calming about creating with your hands. It’s a break from screens, from stress, from routine. Just you, your scissors, and your creativity.
That’s why DIY cut T-shirts aren’t just a trend. They’re a movement.
Tools and Materials You’ll Need
Before you start slicing away, let’s talk about the basics. The good news? You don’t need a professional studio. Most of what you need is probably already at home.
Here’s your essential DIY cut T-shirt toolkit:
- Sharp fabric scissors (this is crucial)
- Chalk or washable fabric marker
- Measuring tape or ruler
- Pins (optional but helpful)
- Cutting mat (optional)
- Seam ripper (for advanced edits)
Sharp scissors are non-negotiable. Dull scissors create jagged edges and uneven lines. If you want clean, professional-looking cuts, invest in a good pair of fabric scissors and use them only for fabric.
Chalk or washable markers help you plan before cutting. Trust me … once you cut, there’s no going back. Mark your lines first. Measure twice. Cut once.
If you’re trying symmetrical designs, measuring tape is your best friend. Want a perfectly even crop? Measure from the bottom hem up. Planning a side cut? Mark both sides evenly.
Optional tools like pins and cutting mats just make things easier, especially for beginners. But honestly? A flat table and steady hands work just fine.
The beauty of DIY cut T-shirts is simplicity. No fancy gadgets. No expensive supplies. Just creativity and a little courage. 🦁
Choosing the Right T-Shirt Fabric
Not all T-shirts are created equal. The fabric you choose can make or break your DIY cut T-shirt project.
Cotton is the most beginner-friendly option. It’s soft, easy to cut, and forgiving. Plus, it stretches slightly, which helps create those trendy raw-edge curls after cutting.
Blended fabrics (like cotton-polyester) are also great because they hold their shape well. However, they may not curl as much at the edges.
Avoid very thin fabrics if you’re planning dramatic cut-outs. They can tear easily. On the other hand, super thick shirts can be hard to cut cleanly.
If you’re experimenting for the first time, start with an oversized cotton T-shirt. Bigger shirts give you more room for creativity. You can always cut more ..
… but you can’t add fabric back.
Also, consider color. Dark shirts create bold, edgy looks.
Light shirts feel softer and more casual.
Graphic tees can add personality, especially if you design your cuts around the printed area.
Think of fabric like clay. The better the material, the better your result. Choose wisely, and you’ll set yourself up for success.
Transforming a T-Shirt into a Crop Top
Crop tops are probably the most popular DIY cut T-shirt project … and for good reason. They’re simple, stylish, and perfect for layering.
Put the shirt on and mark your desired length. Take it off, lay it flat, and cut straight across. If you want a slightly curved hem, trim the sides a bit shorter than the center.
For a raw, edgy look, leave it as is. For a softer vibe, gently stretch the hem so it curls inward.
You can also create a front-tie crop by cutting a vertical slit up the center and tying the ends together.
The beauty of a DIY crop top is choice. You decide how short. You decide how fitted.
Pair it with high-waisted jeans, skirts, or shorts. It’s effortless fashion at its best.
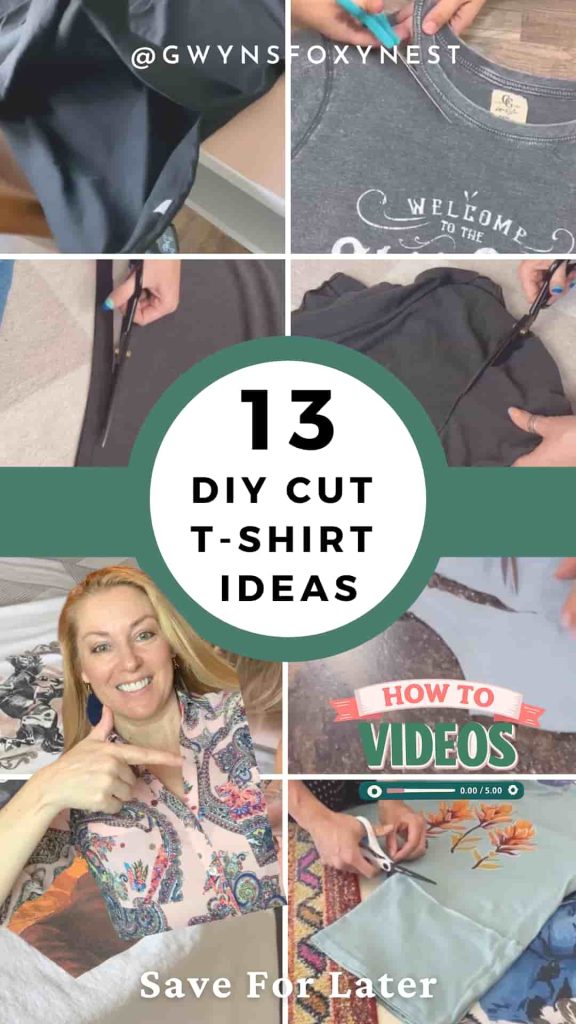
How To Cut A Tshirt Two Ways
Learn different ways to cut a T-shirt into either a cute muscle tank or a soft off-the-shoulder top that drapes effortlessly for a casual, flirty vibe.
How To Cut the Neck Of A Tshirt
Discover how reshaping the neckline can instantly give your shirt a looser, more modern fit that feels relaxed, stylish, and effortlessly cool.
Grab the sublimation tee shirt graphic design HERE
DIY Cut Tshirt Sleeves
Find out how to cut a T-shirt cute sleeves can turn an ordinary T-shirt into a breezy, laid-back piece perfect for warm days or layering.
DIY Vneck Tshirt Cut No Sew
Create a flattering V-neckline that elongates the neck and adds a feminine or tailored touch—no sewing required for an easy upgrade.
DIY Vneck Tshirt Cut Under The Collar
Learn how cutting just beneath the collar keeps structure while adding a subtle plunge that looks polished yet relaxed.
How To Cut Tshirt Neckline off the Shoulder
Turn your basic tee into a soft, off-the-shoulder style that highlights the collarbone and gives off effortless weekend vibes.
Cut T-shirt Into A Halter Top
Transform your shirt into a flattering halter design that frames the shoulders and creates a sleek, summer-ready silhouette or game day ready look!
Cut Tshirt Into Tank Top
Easily convert your tee into a classic tank that feels breathable, sporty, and perfect for workouts or casual layering.
How To Cut A Oversized Tshirt Cute
Learn how to reshape an oversized tee into a flattering, balanced fit that feels trendy and intentional instead of baggy. The bow on the side is adorable!
Cute Cut Tshirt Ideas For Plus Size
Explore cute cut T-shirt ideas for plus-size women that feel comfortable, fupa-friendly, and flattering—designed to accent curves and highlight the hips for a confident, stylish win.
Common Mistakes to Avoid
Let’s save you from frustration. DIY is fun — but a few common mistakes can ruin your project.
First, cutting too much too quickly. Start small. Test. Adjust.
Second, uneven lines. Always measure both sides before cutting.
Third, using dull scissors. Jagged edges never look intentional.
Fourth, ignoring fabric type. Thin fabrics tear easily. Thick fabrics resist clean cuts.
Finally, rushing. Creativity isn’t a race.
Avoid these mistakes, and your DIY cut T-shirt will look intentional, not accidental.
Styling Your DIY Cut T-Shirt
Once your shirt is transformed, styling makes all the difference.
Layer it over a bralette or sports bra for contrast. Pair it with denim for casual vibes. Add chunky jewelry for an edgier look.
For men, combine with joggers, distressed jeans, or layered flannels.
DIY pieces shine when balanced with simple staples. Let the shirt be the statement.
Fashion is storytelling. Your customized tee tells a story of creativity.
Caring for Your Customized T-Shirt
After all that effort, you’ll want it to last.
Wash in cold water to prevent shrinking. Avoid high-heat drying … air drying is best.
Turn the shirt inside out before washing to protect edges and designs.
Raw edges may curl more after washing …. that’s normal and adds the character you want.
Treat it gently, and it will stay your favorite piece for years.
DIY T-shirt Upcycling Old Clothes Projects
A DIY cut T-shirt isn’t just a fashion project …
… it’s a creative experience.
It’s about turning something forgotten into something exciting. It’s about self-expression, sustainability, and style without spending a dime.
With just scissors and imagination, you can reinvent your wardrobe for a great DIY T-shirt Upcycling project. Start simple. Experiment. Have fun with it.
Your closet is full of potential. You just have to cut into it.
FAQs
1. Do DIY cut T-shirts need sewing?
No, most designs require only cutting. Stretching the edges helps create a finished look.
2. What fabric works best for DIY cutting?
Cotton or cotton-blend T-shirts are easiest to cut and style.
3. How do I fix a mistake after cutting?
You can turn it into a deeper cut design, add fringe, or adjust both sides to balance it.
4. Will the edges fray after washing?
Cotton edges usually curl instead of fray, giving a natural finish.
5. Can beginners try complex designs?
I recommend starting with a simple design first. Once comfortable, experiment with more detailed patterns.
Related Articles
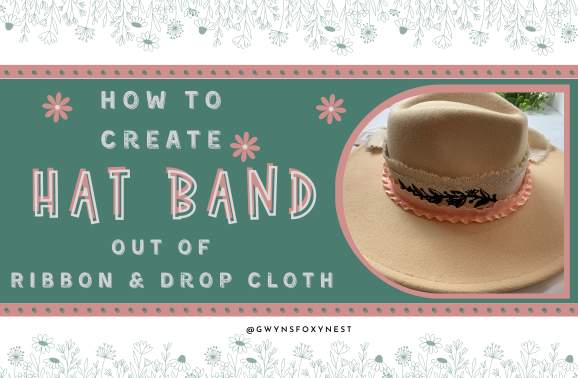
DIY Hat Band Tutorial: How to Make a Western Hat Band
Learn how to make a stylish hat band out of ribbon with this easy DIY hat band tutorial. Perfect for adding a personal touch to any hat!