Are you looking for DIY old desk makeover ideas to give yours a fresh new look? I’ll give you some tips and guide you through the process of transforming your desk into a University of Arkansas themed desk masterpiece using the best Annie Sloan color combinations for University Of Arkansas Dorm Decor with Annie Sloan Emperor’s Silk chalk paint and Annie Sloan Old White Chalk Paint. Get your creative juices flowing and let’s dive in!
Full Disclosure: This article may contain affiliate links. For more info, see the Disclaimer Policy

Step-By-Step Instructions for A DIY Old Desk Makeover For University Of Arkansas Dorm Decor
DIY Old Desk Makeover Supplies
- Furniture piece
- Annie Sloan
- Old White chalk paint
- Emperor’s Silk chalk paint
- Paint Brush – (For smaller pieces just grab a sponge brush from Dollar Tree)
- Annie Sloan Clear Wax or any clear furniture wax. –
- Wax Brush – or cloth
- Cloth ( Old T-Shirt)
- Stencil / silk screen transfer
- Sanding block
- Fabric selection
- Stencil Brush
- Heavy Duty Staple Gun & Staples
Choosing the Right Annie Sloan Chalk Paint Colors Combination
When it comes to painting your desk, Annie Sloan Emperor’s Silk chalk paint and Old White Chalk Paint are the best annie sloan color combinations to create a University of Arkansas themed desk design. Emperor’s Silk represents the vibrant red, while Old White complements it with a classic touch. Gather your supplies and let’s begin!
Preparing the Desk For Chalk Paint
Before you start painting, ensure that the desk is clean and free from any dirt or grime. Use the Lysol wipes to wipe down the furniture piece.
Tip: If the furniture needs more cleaning, I would recommend using TSP heavy-duty cleaner to clean off the grime or years of furniture polish. Just follow the directions on the box to create the cleaner and go over the furniture piece.
Applying Annie Sloan Emperor’s Silk Chalk Paint And Old White Chalk Paint
Now, Let’s start painting! Yup! No sanding is needed!! One of the main reasons I choose Annie Sloan chalk paint for my furniture makeover projects!
For this piece, my inspiration was from the University of Arkansas. I was able to find the fabric and stencil to get a cohesive look. I wanted the body of the desk to be mainly white and have the red peeking through.
I used the distressed painting technique to achieve my desired results because I knew the furniture stencil would not give me clean lines. I love this painting technique because it hides all the imperfections.
First, randomly paint red paint marks where you want it to peek through. Do not paint the whole desk just random “dots”. For this piece, red is painted on the edges and just on the detail of the legs. At this point, you’ll be questioning the whole project. Hahah.. It’s going to look like a bad animal print!
….Trust the process! I promise it gets better!! …
Let the first coat of red chalk paint dry!
Next, paint the whole piece with Annie Sloan old white chalk paint. Yes, paint old white over the random red spots.
Let that dry… If needed, paint another coat of Annie Sloan old white chalk paint.
Once the paint is dry, take a sanding block to distress the paint and bring out the red. Sand the white paint down just in the areas you placed the red “dots” until the red paint peeks through.
Repeat the process for the chair.
Stencil The Design
For the top of the desk, I used a furniture stencil to get the chevron look. Position the furniture stencil and use a stencil brush to apply the paint. You don’t want too much paint on the stencil brush or it will bleed through the stencil. Just dab the brush into the red paint and dab it on the stencil. Reposition the stencil until you have the surface completed. It’s almost impossible to get clean lines with a standard furniture stencil so perfection is not the goal here.
…Once the surface is covered….
… You guessed it!! Let the paint dry!!
Now, take the sanding block to sand / blend the stenciled lines. The distressed look will be your friend when you’re using a standard furniture stencil as it will look intentional where the lines bleed.
Tip: Apply the lighter paint color first (ie Annie Sloan Old White) so you don’t need as many coats of chalk paint for the stencil.
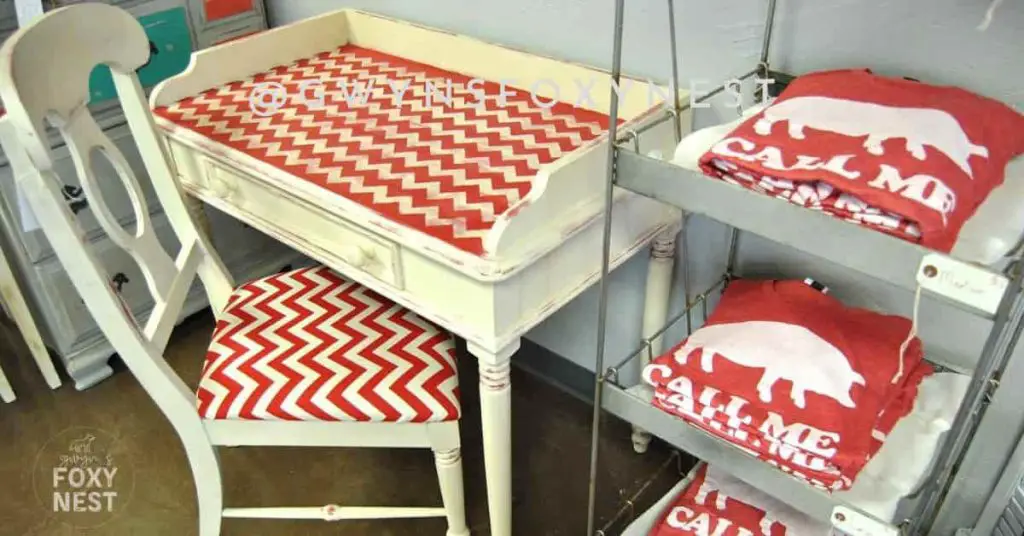
I like to call this DIY old desk makeover “Call Me Hogs” since I live in Razorback country it’s no secret where I got the inspiration from. I wasn’t surprised this one sold in under 24 hours being so close to the University Of Arkansas. To my surprise, it ended up in Chicago. A sweet daddy picked it up for his baby girl headed to college and he hand-delivered it to her. There is something magical about daddies and their little girls. I love knowing where my pieces go home to.
Applying Finishing Touches To The Painted Furniture Desk
Once the paint is dry, If desired, apply a clear wax to protect the paint and add durability. A wax brush or a cloth can be used to apply the wax. Just dip the brush and/ or cloth into the hard wax and smear it on the painted finish. Then take a clean cloth and rub it in. At first, you will notice it’s a bit sticky. Just keep rubbing the wax in until it glides smoothly. You will feel the difference. Now, repeat this process for the whole piece.
Tip: Consider distressing the edges for an aged appearance.
Finally, attach any hardware or embellishments to complete the transformation.
Recovering The Chair With Fabric
This chair’s seat was removable so I was able to use fabric to recover it for a cohesive look. To replace the fabric, turn the chair over to find the screws holding the seat in place and remove the screws. Cut the fabric to fit the seat, place it on the seat, and staple it on the bottom to secure the fabric in place. Now, attach the seat to the chair with the same screws and make sure it’s secured in place.
Tip: If the chair has a wood seat use the same distressed painting technique process as you did for the desk.
Congratulations on transforming your old desk into a University of Arkansas themed desk masterpiece! With Annie Sloan Emperor’s Silk and Old White Chalk Paint, you’ve added vibrant colors and a touch of elegance to your workspace. Enjoy your newly old desk makeover for your University Of Arkansas dorm decor and let your creativity flow!
FAQs
Q1: Can I use other colors for a different themed DIY old desk makeover?
Absolutely! Annie Sloan Chalk Paint offers a wide range of colors to suit your desired theme or style. Get creative and have fun experimenting!
Q: Do I need to sand the entire desk before painting?
No, sanding is not required when you use Annie Sloan chalk paint.
Q: Can I use Annie Sloan Chalk Paint on other furniture pieces?
Yes! Annie Sloan Chalk Paint is specifically formulated for furniture and works wonders on various other surfaces like wood, metal, and even fabric. Let your imagination run wild!
Q: Do I need to buy an Annie Sloan Paint Brush to use Annie Sloan Chalk Paint?
No, you can use a regular paintbrush to use Annie Sloan chalk paint. If you plan on painting lots of furniture pieces I do recommend the Annie Sloan chalk paint brush.
Make sure to pin to PINTEREST!! and follow my blog !!