When it comes to creating a warm and inviting atmosphere for your home, the front porch plays a crucial role. One way to enhance the charm of your porch is by adding a personalized vertical wooden welcome sign. With the help of Chalk Couture wood sign stencil kit, you can easily create unique and eye-catching designs that will make your front porch stand out. Let’s explore how to make a welcome sign with stencil for a DIY front porch welcome sign ideas using stencils for welcome sign making step-by-step video, allowing you to unleash your creativity and leave a lasting impression on your guests.
Full Disclosure: This article may contain affiliate links. For more info, see the Disclaimer Policy

Choosing the Right Stencil For Welcome Sign Design
The first step in how to make a welcome sign with stencil for a stunning front porch welcome sign is to choose the right Chalk Couture stencil design. There are countless options available, ranging from classic and elegant to playful and whimsical. Consider the overall theme and style of your home to ensure that the stencil design complements the aesthetic of your porch. Popular choices include script fonts, floral patterns, and rustic motifs.
Selecting the Perfect Welcome Sign Material
Once you’ve decided on a welcome sign stencil kit design, it’s time to select the ideal sign material for your front porch. Wooden boards, chalkboards, reclaimed pallets, and metal sheets are all excellent options that provide a sturdy base for your stencil work. Keep in mind the weather conditions in your area and choose a material that can withstand outdoor elements. Additionally, consider the size of your porch and opt for a sign material that fits well in the available space.
Using the Right Tools For Stenciling
Having the right tools is crucial when working with a wood sign stencil kit for your front porch welcome sign. Chalk Couture’s high-quality adhesive stencils make it easy to create your own welcome sign at home. Making it easy for one person to complete the project and stencil on wood without bleeding.
Choosing the Perfect Paint Colors
The choice of paint colors can significantly impact the overall appearance of your DIY front porch welcome sign. Opt for colors that complement your home’s exterior and blend well with the surroundings. Neutral shades like black, white, or gray provide an elegant and timeless look, while bold and vibrant hues add a pop of personality. Consider using weather-resistant acrylic or outdoor paint to ensure that your sign withstands the test of time.
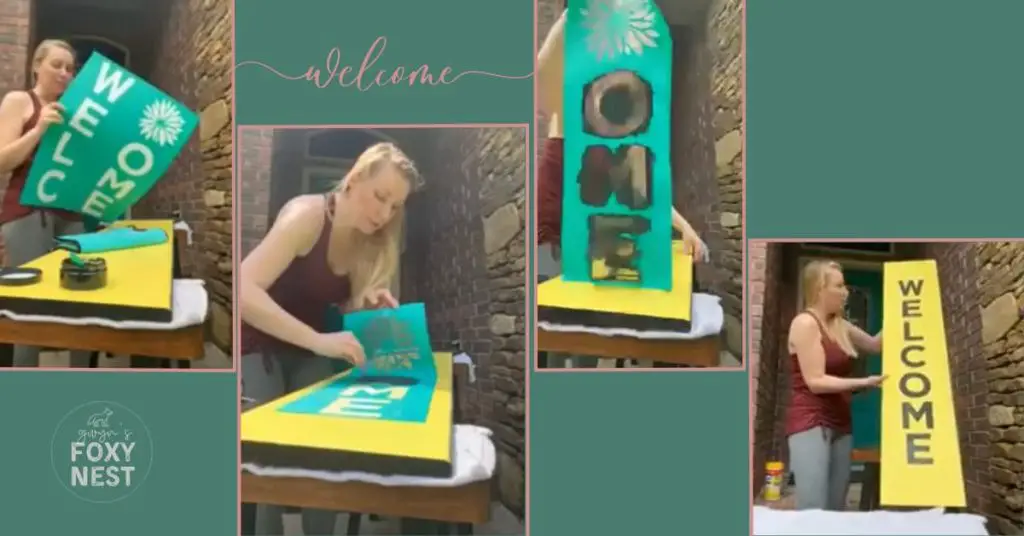
How do you make a porch welcome sign?
I already painted the wood and added a coat of Chalk Couture surface wax before adding the stencil for welcome sign.

DIY Front Porch Welcome Sign Supply List
- Hardware Store
- Untreated pine wood 4ft or 6ft.
- Sander for distressing
- Sprayer Sealer
- Sherwin Williams
- Paint
- Chalk Couture
- Stencil For Welcome sign.
- UPDATE: This stencil kit for wood sign is no longer available but you are able to get a similar look with this Sunflower Welcome Sign stencil Kit
- Chalkology™ paste to match your project. I used the Chalkology™ paste Black Velvet.
- Squeegee
- Fuzzing Cloth
- Stencil For Welcome sign.
Adding Decorative Elements
To further enhance the visual appeal of your front porch welcome sign, consider adding decorative elements that complement the stencil design. Rustic twine, burlap bows, faux flowers, or small wreaths can be attached to the sign to add a charming touch. These embellishments not only add interest but also create a cohesive look with the overall theme of your front porch.
Placing the Welcome Sign
Once your front porch welcome sign is complete, it’s time to find the perfect spot for it. Consider the layout of your porch and the visibility of the sign. Ideally, it should be placed in a prominent location where it can be easily seen by visitors. Hang the sign on a sturdy hook, attach it to a decorative stand, or lean it against a wall or railing, depending on the design and material of your sign. Make sure it is positioned at a height that is easily readable.
Front Porch Sign Ideas with Porch Sign Stencils – 4 Easy Steps
Seasonal and Holiday Welcome Sign Variations
One of the fantastic aspects of using stencils for your front porch welcome sign is the ability to change designs according to the season or upcoming holidays. Consider creating multiple stencils that represent different occasions, such as spring, summer, fall, and winter themes, or specific holidays like Christmas or Halloween. This allows you to update your front porch decor and keep it fresh and exciting throughout the year.
Maintenance and Protection of Wood Welcome Sign
To ensure that your front porch welcome sign remains in excellent condition for a long time, it’s important to take proper care of it. If your sign is exposed to direct sunlight, consider applying a protective sealant to prevent fading or peeling of the paint. Additionally, during harsh weather conditions, such as heavy rain or snowstorms, it’s advisable to bring the sign indoors temporarily to avoid damage.
Here are a few tips to keep in mind for the perfect front porch signs ideas.
- You can use almost any type of wood you would like for front porch signs ideas. I used untreated pine 4ft board. They come in 4ft & 6ft boards from your local hardware store. I used the 4ft for this video.
- Paint the board with your favorite colors.
- Make sure to prep the surface with surface wax to protect your surface and the Chalk Couture silk screen transfer / stencil. You would apply the wax after you paint the surface and before you lay down the stencil.
- Learn how to prep a wooden surface for a Chalk Couture design.
- The smoother the surface the clearer the stencil font will come out.
- If you use a rough wood surface the stenciled font will look very rustic and bleed.
- To help with spacing keep the silk screen transfer / stencil together as much as possible. Cut it only once down the middle.
- The Chalk Couture silk screen transfer / stencil can be used on any surface (i.e. wood, glass, metal, chalkboards, etc..).
Shop Chalk Couture Letter Stencils
Creating a DIY front porch welcome sign using stencils for welcome sign making is a fantastic way to add a personal touch and warm welcome to your home. By carefully selecting the stencil design, sign material, chalk paste colors and paint colors, you can create a unique and eye-catching sign that reflects your style and enhances the curb appeal of your front porch. Don’t forget to experiment with different stenciling techniques and add decorative elements to make your sign truly one-of-a-kind. With proper maintenance and the option to switch designs for different seasons or holidays, your front porch welcome sign ideas will continue to impress and greet your guests for years to come. Enjoy the process of creating your own masterpiece and make your front porch a welcoming haven that leaves a lasting impression that sets the stage for memorable experiences and a sense of home.
Now create something you can feel proud of for your neighbors and family to see!! Yes, It really is that easy!! Don’t forget to share pictures of your creation with me. Come on over to my Facebook page and share it with me.
Make sure to pin to Pinterest! and follow my blog !!
FAQ’s
Q1: What kind of wood do you use to make porch signs?
I use untreated pine from my local hardware store to make porch signs.
Q2: What is the best size for porch signs?
The best size for a porch sign is 4ft – 6ft because you can buy the wood that size at the local hardware store.
Q3: What is the best paint for porch signs?
I use outdoor paint from Sherwin Willaims and Chalk Couture chalk paste for my DIY porch signs.

Related Articles
- DIY front porch welcome sign ideas
- Chalk Couture Wooden Surface Prep 101
- Tell me more about Chalk Couture.


