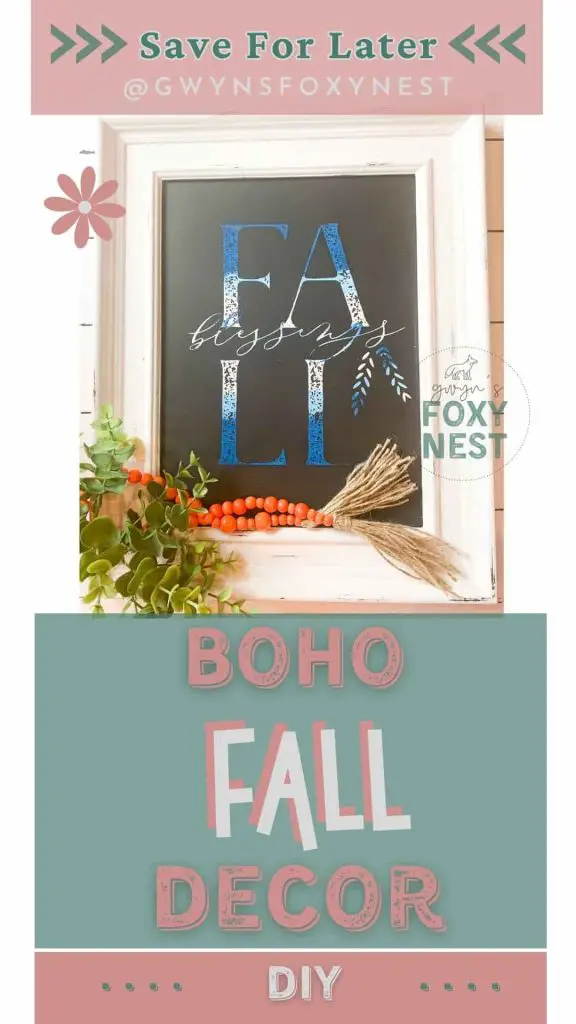
Creating simple boho decor ideas for fall using Chalk Couture fall stencil letters is a versatile way to add boho character that allows you to create beautiful and personalized DIY boho home decor. With the Chalk Couture ombre technique, you can add depth and dimension to your fall home decor designs and make them stand out. Today, Let’s walk you through step-by-step how to master the chalk couture ombre technique and create simple boho decor ideas for fall.
Full Disclosure: This article may contain affiliate links. For more info, see the Disclaimer Policy
What is the Chalk Couture Ombre Technique?
The Chalk Couture ombre technique involves blending two or more colors of chalk paste to create a gradient effect on your boho craft project. It’s a popular technique among crafters because it adds depth and dimension to their designs. You can easily transition from one color to another and create a smooth ombre effect.
Materials Needed for the Chalk Couture Ombre Technique
- 2 Chalk Couture paste in your desired colors
- A Chalk Couture stencil / transfer
- 2 squeegees
- A chalkboard or other surface to apply your design. For your first time, I recommend using a chalkboard so you can easily clean it off to play with the ombre technique.
- Fuzzy Cloth (Optional: You can use a bathroom towel)
Step-by-Step Guide to Mastering the Chalk Couture Ombre Technique
Now that you have all the necessary materials, it’s time to get started!
Step 1: Choose Your Ombre Colors for Boho Home Decor
The first step in the ombre technique is choosing the colors you want to blend. Pick two or more colors that complement each other and create a cohesive look.
Step 2: Apply the Lighter Ombre Chalk Paste Color To Fall Stencil Letters
Start by applying the lighter color of chalk paste to half of your transfer. Use a squeegee to spread the paste evenly and remove any excess.
Step 3: Apply the Darker Ombre Chalk Paste Color To Fall Stencil Letters
Next, apply the darker color of chalk paste to the other half of your transfer.
Step 4: Create The Ombre Effect For Fall Chalkboard Art
Take your finger and blend where the two colors come together until they are blended on that line. You can play with this step to get the desired ombre effect.
Tip: Make sure the Chalk Couture paste does not dry while you are playing because the paste will come off when you pull up the transfer.
Once you have the desired effect carefully lift the transfer to reveal your design.
Step 5: Clean Your Chalk Couture Fall Stencil
After transferring your design, clean your transfer with warm water and gentle soap. Make sure to remove any excess paste before storing it for future use. Lay the transfer with the sticky side up to dry. Once it’s dry put it back on the white backer sheet with sticky and shiny sides together.
Step 6: Admire Your Ombre Fall Chalkboard Home Decor Creation
Now that you’ve mastered the chalk couture ombre technique, step back and admire your creation! You can use this technique on a variety of surfaces, such as chalkboards, wood, glass, and more.
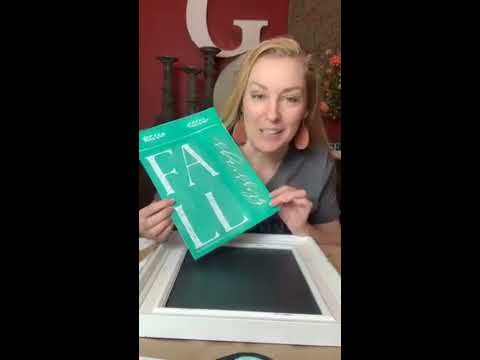
Chalk Couture Ombre Technique Online Youtube Tutorial
This video walks you through the process of creating ombre letters in less than 20 min.
The chalk couture ombre technique is a fun and easy way to add dimension and depth to your simple boho decor ideas for fall. With a few simple steps, you can create stunning designs using fall stencil letters that will impress your friends and family. Remember to choose complementary colors, blend thoroughly, don’t let the chalk paste dry, and experiment with different techniques to find what works best for you. Happy crafting!
Subscribe to my blog !! Make sure to save your favorite project to PINTEREST!!
Come say hello on Facebook!
Shop Chalk Couture Stencil Specials
FAQs
Do I let the first ombre chalk paste color dry before I add the second ombre color?
No, both colors will need to be wet for the ombre technique to work.
One Comment