Are you looking for a creative and budget-friendly way to add a touch of boho charm to your baby’s room, we have the perfect DIY Dollar Tree boho decor for baby room project for you. I’ll show you how to create stunning wall art using a Dollar Tree sign and Chalk Couture stencils kit. Get ready to unleash your artistic side and transform your baby’s room into a whimsical haven. Let’s get started! I have it broken down into two different sections.
Full Disclosure: This article may contain affiliate links. For more info, see the Disclaimer Policy

Section 1 – Turn A Boring Dollar Tree Sign Into An Ombre Wall Art
Creating an ombre wall art piece for your nursery room is a wonderful way to add a touch of beauty and serenity to the space. The gradual blending of colors creates a mesmerizing effect that will captivate both you and your little one. I’ll walk you through the steps of creating an ombre wall art piece that will be the perfect addition to your girls nursery decor. Let’s get started!
Dollar Tree Ombre Sign Materials You’ll Need
- Dollar Tree
- Dollar Tree Sign
- 3 Paintbrushes
- Paper towels to clean up the mess.
- Sherwin Williams
- Paints in your desired colors (preferably 3-5 shades of the same color family) You can use any paint you would like such as acrylic, chalk paint, watered-down chalk paste, etc.
- Chalk Couture
- Surface Wax & Applicator
- Water Bottle – This is the secret. It’s a fine mist water bottle giving the perfect amount of water to evenly spread the paint without overdoing it.
Step-by-Step Instructions To Paint Ombre Wall Art
Step 1: Prepare Your Workspace
Find a clean and well-ventilated area to work in. Lay down a protective covering to prevent any accidental paint spills or splatters. Make sure you have all your materials within reach.
Step 2: Choose Your Ombre Colors For DIY Dollar Tree Craft
Select a color palette that complements the overall theme and color scheme of your nursery. For an ombre effect, choose 3-5 shades of the same color family, ranging from light to dark. This will create a seamless gradient from top to bottom.
Step 3: Prepare Your Dollar Tree Sign
If you’re using a Dollar Tree sign, ensure it’s clean and free from any dust, debris or glitter. If you prefer a wooden board, make sure it’s sanded and smooth. You can also paint the board in a neutral color as a base if desired.
Pro Tip: For Dollar Tree signs that have glitter simply spray it with a fine mist of water and scrape off the glitter. Time Saver!!
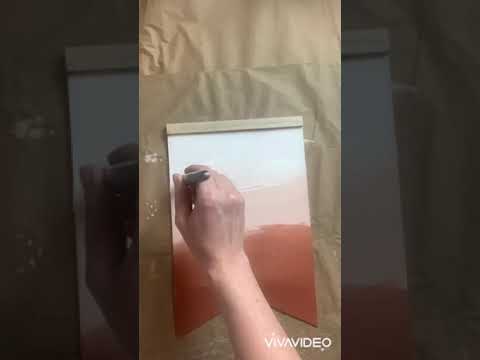
Step 4: Start Painting Using the Ombre Painting Technique
Begin at the top of your boho sign. Using a wide paintbrush, apply the lightest shade of paint in broad horizontal strokes. Work your way down, gradually switching to the next darker shade as you move towards the bottom working in sections. Once the base colors are dry, paint one row of 2 touching colors and mist with water. Now blend those two colors together and repeat for each color.
** Watch the video for a better understanding **
Step 5: Let It Dry and Add Final Touches
Once dry, step back and assess the overall look of your ombre wall art. Add Chalk Couture surface wax to prep the surface for Chalk Couture stencil.
How To Create An Ombre Wall Art For Nursery Room
Ombre Painting Tips and Ideas
- Experiment with different color combinations to create unique ombre effects. You can try using warm or cool tones, pastel shades, or even bold and vibrant colors, depending on your nursery’s theme and your personal preference.
- Consider using a pencil to lightly sketch out the boundaries between each shade before painting. This can help you visualize the ombre effect and ensure a smooth transition between colors.
- If you’re unsure about blending the colors directly on the sign, you can practice on a separate piece of paper or a spare board to get a better sense of how the colors will blend together.
Creating an ombre wall art piece for your nursery is a rewarding and enjoyable DIY project that adds a beautiful and calming ambiance to the room. Now, let’s walk through step 2 to add the Chalk Couture stencil art kit.
Section 2 – Add Chalk Couture Inspirational Quote Stencil
Girl Nursery Sign Materials You’ll Need
- Dollar Tree
- Dollar Tree wooden sign painted ombre and surface wax applied.
- Chalk Couture
- Chalk Couture stencil of your choice. The one shown in the video is no longer available but it was an 8.5 X 11 size stencil.
- Chalk Couture paste in a color you choose.
- Chalk Couture squeegee
- Chalk Couture Fuzzing Cloth
Step-by-Step Instructions For DIY Dollar Tree Nursery Decor
Step 1: Prepare Your Workspace
Find a clean and well-lit area to work on your project. Lay down a protective covering to avoid any mess and make sure you have all your materials within reach.
Step 2: Choose Your Chalk Couture Stencil and Chalk Paste Color
Select a Chalk Couture stencil that fits the boho theme you envision for your baby’s room. There are various designs available, from intricate patterns to nature-inspired stencil art kits. Choose colors that complement your nursery room’s color palette. The one I used in the step-by-step video below is an exclusive design only available for the month of March for Chalk Couture club members.
Step 3: Position the Stencil on the Sign for Dollar Tree Nursery Decor DIY
Ensure the paint is dry and one coat of surface wax has been applied. Place the Dollar Tree sign on your workspace, fuzz the stencil with the fuzzing cloth, and position the Chalk Couture adhesive stencil on top of the sign.
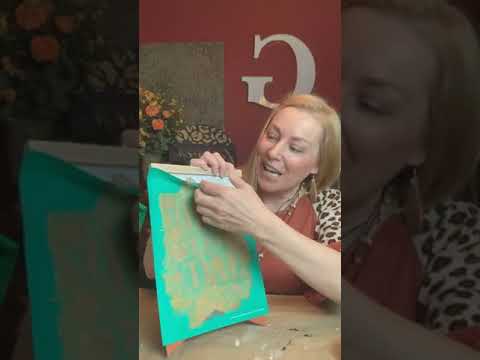
Step 4: Apply Chalk Couture Paste To The Stencil
Using the Chalk Couture squeegee, pick up a small amount of paste and apply it over the stencil art kit design. Spread the paste evenly, making sure to cover all the openings in the stencil. I used Chalk Couture gold chalk paste on my DIY Dollar Tree craft project.
Step 5: Remove the Inspirational Quote Stencil
Carefully lift the stencil away from the sign while the chalk paste is still wet, ensuring not to smudge the applied design. Take your time during this step to maintain the crispness of the design. Admire the intricate details that the Chalk Couture stencil has created. Allow the Chalk Couture paste to dry completely.
Step 6: Hang and Enjoy
Once the chalk paste is dry, it’s time to hang your DIY boho wall art in your baby’s room. Choose a prominent spot where it will be the focal point of the space. Step back and admire your creativity as the room comes alive with the boho vibe.
How To Create DIY Dollar Tree Boho Decor For Baby Room Using Chalk Couture Stencils
Tips and Ideas for DIY Boho Wall Art for Nursery
- Experiment with different Chalk Couture stencil designs to create a gallery wall effect. Combine patterns, quotes, and images to make a unique statement in your baby’s room.
- Incorporate different colors of Chalk Couture paste to add depth and dimension to your wall art. You can create an ombre effect or use contrasting colors for a striking visual impact.
- Personalize your wall art by stenciling your baby’s name or initials onto the sign. This adds a special touch and makes the decor even more meaningful.
- Don’t limit yourself to wooden signs. You can also use Chalk Couture stencils on glass frames, canvas, or even repurposed items like old trays or mirrors. The possibilities are endless!
With this simple DIY Dollar Tree boho decor for baby room project, you can create beautiful DIY boho wall art for nursery room without breaking the bank. The combination of Dollar Tree signs and Chalk Couture stencil art kits allow you to unleash your creativity and bring a touch of whimsy to the space. Let your artistic side shine as you design unique and personalized wall decor that perfectly complements the boho theme.
So gather your materials, choose your favorite Chalk Couture stencil, and let the creativity flow. Your baby will have a one-of-a-kind DIY boho wall art for nursery piece that adds charm and personality to their room.
FAQs (Frequently Asked Questions)
Q1: Is Chalk Couture paste safe for baby’s rooms?
Chalk Couture paste is water-based and non-toxic, making it safe for most applications. However, it’s always a good idea to check the product labels and conduct a patch test if you have any concerns about potential allergies or sensitivities.
Q2: Can I customize the size of the Dollar Tree wooden sign?
Absolutely! Dollar Tree wooden signs come in various sizes, but if you prefer a different dimension, you can easily resize or cut the sign to fit your specific needs. Just ensure you have the appropriate tools and take the necessary precautions while handling the materials.
Q3: How can I clean and maintain Chalk Couture wall art?
To clean your Chalk Couture wall art, simply use a duster to gently wipe away any dust. Avoid using harsh chemicals or abrasive cleaners as they may damage the artwork. With proper care, your Chalk Couture wall art should maintain its beauty for years to come.
Q4: Can I use different painting techniques with Chalk Couture paste?
Chalk Couture paste is versatile and can be used in various painting techniques. Experiment with brush strokes, blending colors, or layering to achieve different effects and texture backgrounds. Don’t be afraid to get creative and explore different techniques to make your boho wall art truly unique.
What did you think ? Are you considering giving it a try? I would love to see your design over on my Facebook page! Just drop a picture in one of the posts.
Oh! Make sure to pin this for later!! And follow me for more DIY inspiration!!
One Comment